No operating system is perfect: they all need a little tweaking here and there. Here’s what I use to make Leopard, um, purr. (Sorry.)
Top 10 Leopard Tips, Tricks & Fixes
If you’re like me, you’re very particular about your desktop: whether that means swapping icons, toggling options or disabling features, if you spend all day in front of your computer (sigh…) you want to be happy and feel settled in. And while it can take some time to get it just right (some OS’s take longer than others), in the end you’ll be glad you did. So without further ado I present my top 10 Leopard tips:
10. Opacity is the New Transparency
Mercifully, Apple listened to its users and made a number of terrific improvement to Leopard with the latest “dot” release: 10.5.2 lets you fix the previously broken dock, menu bar and stacks without resorting to Terminal hacks. For me, the best part is this:

Fig. 1. Do yourself a favor and uncheck this.
You can uncheck the “Translucent Menu Bar” option under Desktop & Screen Saver in System Preferences.
Aside from the clear benefit of jettisoning the UI-trainwreck that is apartially invisible menu bar, there’s a great side effect: it will sharpen the menu text. Turns out it was a kind of “faux” translucency effect that Apple used, and so turning it off will restore the original crisp anti-alias. The tons-more-readable “System Preferences” was the first thing I noticed.
9. Get Your Widgets On (Your Desktop)
Widgets are typically only accessible when you invoke Dashboard but it turns out you can configure them to live on your desktop, too — you just have to trigger the “developer” mode. This is particularly useful with the new Webclips feature in Leopard… first, open up Terminal (found in Applications > Utilities) and then enter in the following, in two steps:
- defaults write com.apple.dashboard devmode YES
- killall Dock
So you type the first line, hit enter, then type the second one to relaunch the Dock (don’t let the “killall” scare you — I think the Unix folks were just having a bit of fun with that one). Then fire up Dashboard (It’s F12 by default, or F4 if you’re using the fancy-schmancy new Apple keyboards. Which I am. They’re awesome.) and click on any widget to begin dragging it. Without letting go, hit F12again: the widget should still be visible. Let go of the mouse button, and presto! A widget on your desktop. It’ll float in front of your other windows, so you may want to move it to another Space.
I realize some of you are bound to point out the irony of jumping through a bunch of hoops to replicate something Vista does standard with its “Gadgets” (Wow, great name! How’d they come up with that?), but there you have it.
8. Finding Finder (in Every Space)
Spaces is great. Some folks aren’t too thrilled with it, but it suits me just fine: it’s especially handy keeping my Fusion/Windows installation running in another spot where I can get to it easily. (I typically hide applications when I’m not using them, so my needs are simple.) But what I did miss was having access to open Finder windows when I needed them, since switching to existing, open windows would swing me back to whatever Space they’re already in.
The solution? You can assign Finder to every Space, so if you’ve got one or more windows open in a Space and jump to a new one, it stays put. To do that, open up Exposé & Spaces in the System Preferences and click on the Spaces tab. Then click the (+) button to add a new assignment to “Every Space”. For Finder, the only catch is knowing where to, er, find it — it’s in the CoreServices folder:
/System/Library/CoreServices/Finder.app
Navigate there and you’re done.
7. Lose the Printer On Purpose
In previous versions of OS X, the printer icon would disappear whenever a job had completed. But you may have noticed that in Leopard, it just lingers in the Dock, oblivious to the world and my clutter-free desktop, taunting me with its unnecessary-ness…
Fortunately, it’s easy to get rid of. When a print job is done, right-click on the Dock printer icon and select “Auto Quit” from the pop-up menu. Begone!
6. Finder GPS
Want your Finder title bar to show you the current folder’s path, Unix-style? Easy: fire up Terminal and type
- defaults write com.apple.finder _FXShowPosixPathInTitle -bool YES
then press return. Next, hold down option and right-click the Finder icon in the Dock and select “Relaunch”. You should see the path written out in the title bar of all Finder windows. (To undo this, repeat the same command as above but with NO instead of YES.)

Fig. 2. Here’s what I mean.
It’s true that Finder has a great functional path bar in Leopard that you can see by clicking View > Show Path Bar, but there’s something appealing to me about seeing it right at the top, front and center. So there.
5. Pixel-Perfect Screenshots
Did you know you can tweak your screenshot selection? Command + shift + F4 has long been a Mac user’s BFF for taking a screenshot and saving it as a file to the desktop. But while you’re making your selection, you have several options to fine-tune it: press the shiftkey to lock your selection along either the x- or y-axis or press theoption key to resize from the center instead of the corner. You can also use both together (shift + option) to combine the two. Best of all? Hit the spacebar to freeze it so you can move it around on screen.
4. Light Up Your Grid
I was not a particularly big fan of Stacks when it first debuted so I’m glad the 10.5.2 update lets me revert folders in the Dock back to proper folders. (Right-click and choose Display as Folder.) I still like the Grid view on occasion but have 2 major beefs with it:
- I can’t open up the folder directly — I have to right-click, then choose “Open”. Two steps is one step too many.
- In Grid view, I can only open one file/folder and the view collapses. I want it to stay open so I can get at multiple files.
Guess what? No more needless clicks… you don’t have to live this way. You can get off the streets, find a job, enroll in a vocational training program!
…wait, sorry, I think that was another article. (What was I on about, again? Grid view and Stacks? Right.) For each of these, all you need to do is hold down a keyboard modifier when you click: for the the first point, you need command, and it opens right away. (Slick, no?) For the second, hold down option, and the Grid view stays open while you click away.
But that’s not all. Why not a little special UI pixie dust in the form of… mouseovers!

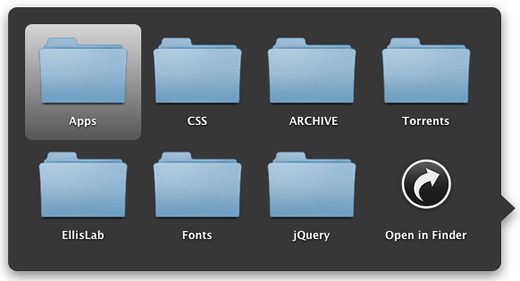
Fig. 3. My Downloads folder. Don’t settle for lame Stacks default behavior!
Once again, back to Terminal:
- defaults write com.apple.dock mouse-over-hilte-stack -boolean YES
- killall Dock
Second verse, same as the first! This will highlight items in your Grid view as your cursor hovers over them.
3. (Even) More Daily Caffeine
Macbook Pro: power management dims your screen after a few minutes of inactivity. Macbook Con (hee hee!): power management dims your screen after a few minutes of inactivity. That doesn’t bother most people, but it kind of gets on my nerves, especiallywhen I’m trying to demo something to a client and it keeps going to sleep.
So what to do, if your computer keeps napping on you? Caffeine to the rescue! This is a little app that runs in your menu bar and keeps your machine awake. I have mine set to launch on startup and you can click to toggle it on/off. Problem solved!
You drink coffee all day, why shouldn’t your computer? Now, if only there were an app to help me get over those post… lunchtime… snoozZz-zzz…
2. Take Control of Your Shortcuts!
If you’re standing up right now (I’m not sure why you would be…) you might want to sit down, ‘cause I’m gonna blow your mind. Get this: you can customize any keyboard shortcut for any app anywhere on your computer — not just the system presets. You may be familiar with the Keyboard Shortcuts tab in the Keyboard & Mouse system preference pane. You may further have figured out that you can customize a bunch of existing shortcuts…
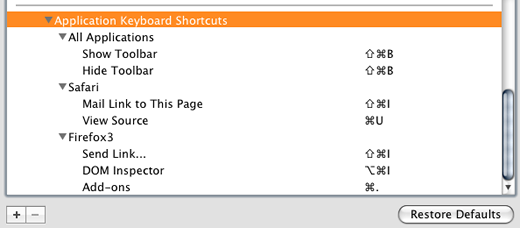
But! Did you know you can create your own and edit ones that aren’t listed? Works like this: scroll down to the bottom, you’ll see a line that says “Application Keyboard Shortcuts” with a triangle next to it. Select it to highlight, then click (+) to create a new shortcut. Choose “Safari” from the drop down menu and for the “Menu Title” input box type “View Source”. And then — here comes the magic! — click in the “Keyboard Shortcut” input and type “command + U”.

Fig. 4. Can you believe it?
Now, command + U will open “View Source” in both Firefox and Safari! Do you realize what you’ve done?! I can’t tell you how long it’s bothered me that they were different — my brain can’t handle switching things up like that (by default, Safari is option + command + U).
But you needn’t stop there — there are all kinds of possibilities! For example, I find myself constantly emailing links to colleagues, family and friends. Previously, I would just right-click anywhere in the page in Firefox and choose “Send Link…”. Which isn’t terrible, but it’s two steps, which — if you know me — is one step too many (we’ve been over this; see #4). In Safari, you don’t have that option, but you can hit shift + command + I to do the same thing.
Now, since I’d already trained myself to use the Safari shortcut, I thought, I bet this will work, too. Et voilà, Firefox now behaves the same way! If you try it and it doesn’t work, the key here is that you must type in the menu command exactly as it appears: so for Firefox, you include the ellipsis “Send Link…”. You can use this tip not only to add keyboard shortcuts for menu commands that don’t have them but also to re-assign actions that already do.
That’s all there is to it. Go crazy!
(I should point out, too, that while you’re there in that SysPref pane, you’ll want to set “Full keyboard access:” from “Text boxes and lists only” to “All controls”. This will let you tab-navigate between form fields in Safari, including “remember me” boxes. For some reason, this is disabled by default and it took me ages to figure out. You’re welcome!)
1. View Mail as Nature Intended
At last we come to my #1 Leopard fix — the one that is so important to me, I delayed upgrading to Leopard until I saw that someone had written the app for it. I give you… WideMail!
Here’s the thing: you see, I like Apple Mail a lot. It doesn’t have all the bells and whistles of other email clients (though the new name / address recognition stuff and iCal integration is hot) and there’s plenty of room for improvement. But the absolute one thing I can’t stand is “vertical email”: you know what I mean, where the email source list is on top and the message itself in a window below it. I don’t know why it bothers me so much, but it does. I can’t stand it. I mean, when Ray Tomlinson invented email back in prehistoric times, I’m pretty sure he didn’t mean for it to be viewed in such a crude, inelegant way.
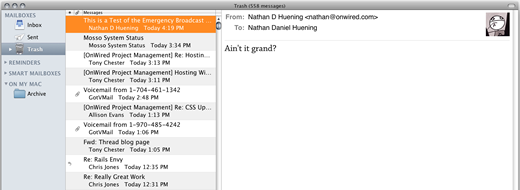
So, what should it look like? Behold!

Fig. 5. Now we’re talking.
That’s more like it. For some reason, Apple Mail doesn’t allow you to change its default vertical view to the clearly superior three-column view (which is how man was meant to electronically correspond). So Mr Harnett whipped up a plugin to take care of not only this most atrocious of email reading crimes but also to throw in several other kick-ass features (like custom zebra striping — hallelujah!). For example, you have the option to display your source column with two rows per individual email instead of one, which means I can include the subject, sender and date all in a narrow column and still read the whole message without needing to open it in a new window. It installs (as of v0.5) as a tab in the Mail preferences.
Special Bonus Feature for Reading This Far
So that’s my Leopard hacks review in a nutshell. There are, of course, many more cool things you can do with OS X, much of which is only available via Terminal commands: Apple doesn’t include a user interface toggle option for them in System Preferences. You can spend days searching all over the interwebs for these and while some sites are devoted to practically nothing but, it’s still a hassle to keep track of.
Which is why I’m pleased as a junebug in a china shop to recommend the ultimate Mac OS hacking assistant: take a gander at Secrets! It’s a plugin that installs itself as an “Other” in the System Preferences window and gives you UI access to many of the tips I described above, plus many more. And new ones are being added all the time — so go give it a spin!*
Latest posts by (see all)
- Outperform Your Competitor: 3 Solid Strategies For Your Website - March 11, 2020
- How To Drive Conversions With Content - February 18, 2020
- Top 8 Web Design Trends to Nail It in 2020 - January 20, 2020

Leave a Reply